DUCATI Panigale V4 25° Anniversario 916 BUILD Thread

BMW Alpina

FOUNDING Member & Administrator
Staff member
More update (this update was done in the middle of the night few months ago):

First, I forgot to post that since the connector for the Ducati Brake Switch is proprietary for Bosch and no ones sell it, I decide to swap the brake switch. Picture below is the brake switch from the original Ducati Master Cylinder and compare to the one from the 17RCS Corsa Corta (blue dimple) on the right picture:
IMG_8038.JPGIMG_8039.JPG

Stock Brembo Brake Switch installed on the 17RCS Corsa Corta, it FIT PERFECTLY 👍
IMG_8040.JPGIMG_8041.JPG


I also disassemble the entire REAR Subframe to measure all the bolts that can be replaced with ProTi Titanium bolts and order them.
IMG_8024.JPG


Thanks to @PanigalePilot with his idea to replace with lighter Horn and Carbon Fiber bracket, so I ordered this PIAA horns and arrived today.
I was planning to order just 1 horn the 500Hz one, but strangely, the price for the 2 horns package is cheaper than the 1 horn. However, I don't plan to add relay and complication with extra wiring,
so I only going to use a singe 500Hz horn and keep the 400Hz horn for... well maybe my future display rack 🗄
IMG_8031.JPGIMG_8032.JPG
 

BMW Alpina

FOUNDING Member & Administrator
Staff member
I installed the Oberon Clutch Slave Cylinder with all ProTi Titanium bolts. However, I notice the Ducati factory Slave Cylinder have extra O-Ring, while the Oberon version did not. Hopefully this is not an issue.

IMG_8085.JPG

BEFORE left picture and AFTER, RIGHT picture (I also install Stahlbus Banjo/Bleeder Combo and my hand painted (spray can) Red Sprocket Washer.
The ProTi Titanium Bolts with gold color will be the one that also hold the Carbon Fiber Sprocket Cover, that is why they are gold. The rest of the ProTi bolts that hold the Oberon Slave Cylinder were Titanium Silver Color:

IMG_8084.JPGIMG_8086.JPG
 

BMW Alpina

FOUNDING Member & Administrator
Staff member
I replaced the LARGE M16 Bolts that hold the handlebar (at the end of the handle bar), to do this I need to use Insert that convert the M16 to M10, I use Shell Gadus per factory recommendation on the insert:

IMG_8075.JPGIMG_8076.JPG

Thread it in and using special tool and rubber hammer, I lock the 4 pins:
IMG_8078.JPGIMG_8079.JPG


Then, I use Real TITANIUM Spacer (originally for some brake caliper) combine with M10 ProTi Titanium bolt:
IMG_8080.JPGIMG_8081.JPG


And Final Result for Right handlebar:
IMG_8090.JPG


Below is the picture for the left handlebar.
IMG_8092.JPG

I haven't replace my upper Triple clamp with my Melotti Racing yet because I still need to take out my lower triple clamp so I can replace the Horn Bracket bolt with ProTi (and also the side front magnesium bracket bolt).
I can't do this right now until I finish with the rear suspension and rear axle just so my ABBA stand can lift the front wheel.
 

Attachments

BMW Alpina

FOUNDING Member & Administrator
Staff member
However, I manage to install the upper ProTi Titanium Bolt for the magnesium front subframe, along with with the bolts that hold the Ohlins damper, so it is a quite satisfying day 💪
IMG_8091.JPG


I also decide to install the ProTi Titanium bolt for the left clutch master cylinder bracket just so I can reduce the hundreds of ProTi Titanium bolt still in the box...
I will of course need to remove it again when I replace the Clutch MC with 16RCS Corsa Corta Clutch Master Cylinder. Left picture before, right picture after:
IMG_8054.JPGIMG_8055.JPG


I then replace the LEFT bolt that hold the Ducati by Rizoma Front Axle Slider with ProTi Titanium bolt, I did not replace the right one since it seemed to be permanently Loctite from the factory for ease of install:Left picture before, right picture after:
IMG_8069.JPGIMG_8070.JPG


After that, I replace the CENTER bolt that hold my ALLEA frame slider with GOLD ProTi Titanium Bolt.
Left picture BEFORE and Right picture AFTER:
IMG_8071.JPGIMG_8072.JPG


Then, more ProTi bolts arrived that day so I replace the bolts that hold the STM Generator Cover with the ProTi Titanium Bolts that have the right length and also a bit smaller head diameter for the "just the right size" look.
I also decide to replace the O-Ring with a new O-Ring just in case, right picture show the STM Generator Cover now with the "correct" ProTi Titanium Bolts:
IMG_8073.JPGIMG_8074.JPG

OH, I forgot,, I also install the Stahlbus for the 17RCS Corsa Corta, the RED cover really brighten up the mood around that area :cool:
IMG_8087.JPGIMG_8094.JPG
IMG_8095.JPG


and of course more ProTi bolts arrived later that they... so I need to work more then...
IMG_8035.JPG
 

Attachments

BMW Alpina

FOUNDING Member & Administrator
Staff member
A slow day for me, because I only perform the following:
a. Took out the Clutch Line from the bike and taking pictures to documented the banjo orientation and also where the tie lock is for my reference to remind me when I install a new line (hopefully 700 Series Kevlar Braided Goodridge).
IMG_8096.JPGIMG_8098.JPG

IMG_8107.JPG

Install some more ProTi bolts for the airbox cover and also the lower triple clamp. Oh, I have some extra unused M5 ProTi Titanium Bolts in gold color and rather then having them unused in their boxes, I decide to use them to cover the 2 empty thread on the lower triple clamp for now... Hopefully I can use those 2 holes for the bracket that will hold my new front brake lines:
IMG_8103.JPGIMG_8104.JPG

IMG_8099.JPGIMG_8100.JPG

IMG_8106.JPG


I also put the lower jack stand below the bike to support the engine, and hopefully I will received the MotoCorse Right Side Engine Bracket on Monday (or Tuesday) so I can install it asap 🙌

IMG_8105.JPG

Next, my goal was to put the front wheel on the Baxter choke stand again to make the bike stable and then I can remove the rear swing arm with only the jack under the oil sump to support it. (Can't use ABBA stand to remove the swing arm).

Why, I need to remove the swing arm? Because, the only way to properly torque the rear Ohlins bracket is to remove the swing arm...

Seriously, I fall in love with this Ducati, otherwise, no way I am going to remove the swing arm just so I can torque 2 bolts properly...
You know, Things we are willing to do for our love one... 😻

When everything said and done (hopefully by end of this year),
I believe, the only things I will not remove from this bike the engine block from the frame (knock on carbon fiber, hopefully I will not find some modification interesting enough that will require me to do that) 👣

Also have some more ideas this past few days...
One of the idea require me to check with all Brembo's supplier. From the information I gather so far (from the supposedly value added distributor), none give me a convincing answer,
but I think it can be done 👽
 

BMW Alpina

FOUNDING Member & Administrator
Staff member
I am relaxing tonight, and found this song on YouTube, which is a PERFECT song to be playing while you are MODIFYING and UPGRADING your bike 💖:


How did I found the song above? Because I was watching this video (a must watch if you are thinking of upgrading your forks) (y):
 

BMW Alpina

FOUNDING Member & Administrator
Staff member
I was thinking, since your Duc is on display, you’ll need a MotoCorse stand...🤤:love:
View attachment 585
View attachment 586
those stands are beauti’s!
Hi Lucati,
long time ago I was thinking of buying the MotoCorse stand because they are beautiful.
However, I end up buying the Ducati factory stand (front and rear) because they still look the same as the original 1990's Ducati 916 stand and I want to keep the "retro" theme 🧙‍♂️
But, then I also saw the Dynamoto Stand and decided to buy them too (front and rear) because they made it easy when I need to maneuver my bike in my living room.
I must say that The Dynamoto stand is a much more superior stand in stability, practicality and engineering point of view compare to the factory Ducati stand,
however, once I am finished with my modification and don't plan to move my bike around anymore, I will use the Ducati stand just for that "retro" looks 🧝‍♂️
 

BMW Alpina

FOUNDING Member & Administrator
Staff member
I decided to test fit the Ducati by Rizoma Brake Lever Protector to make sure it will fit the Rizoma Throttle Grip.
Turn out the Rizoma Throttle Grip is 3 mm shorter than the handle bar tube causing the "GAP" between the end of the Rizoma Throttle Grip and the Ducati by Rizoma Brake Level Protector:

IMG_8110.JPGIMG_8112.JPG

I don't like this...
So I start looking for washer that have 22mm ID (Internal Diameter) and 32mm OD (outside Diameter)... with 3mm thickness in stainless steel or aluminum...
Well, no washer is readily available off the shelf that meet all my requirements above unless I made a custom one...
Then...
My younger son came to me to remind me it is already very late, I need to go to sleep, so I can be fresh for work tomorrow...
but then he ask, why I am still awake. I explain to my younger son the "critical situation" 😅 ,
and he said, that he can solve my problem easily tomorrow morning and persuade me to sleep.

So, in the morning, my younger son wake up early to design a 3D printed Spacer using our family Dremel 3D printer:

IMG_8109.JPG


And here are the result, no more gap,
My younger son will sanded the surface more and then paint them black.
It might not be going to be as smooth as a custom machine Stainless Steel or Aluminum spacer,
but I prefer to use my younger son creation to remind me that I am a Lucky father and I am really proud with my younger 12 years old son 🙂
IMG_8121.JPGIMG_8122.JPG

Then, the following afternoon, more parts arrived,
I had been waiting for many months for this MotoCorse RIGHT Engine to Frame mounting bracket to arrive, not only because I want to install it, but also I want to use it first as color sample to anodize the Rear BrakeTech Rotor Carrier, and I must say, the MotoCorse anodizing quality is better than all the other anodized parts I bought so far (y)


IMG_8115.JPGIMG_8116.JPG


I am imagining on how it looks on the bike (don't forget, I also already bought a CONTRASTING Titanium Silver Color ProTi bolts for the 3 smaller bolts and the MotoCorse Large Frame Bolt Cover):

IMG_8117.JPG

And 2 other Ilmberger carbon parts arrive too:
first one is the Left side air channel (I already received the right air channel long time ago) and the Carbon exhaust rear manifold cover. Now I need to buy the ProTi bolts needed for that Carbon Exhaust Rear Manifold Cover...

IMG_8118.JPGIMG_8119.JPG
 

BMW Alpina

FOUNDING Member & Administrator
Staff member
I prefer a true dual separate line to each caliper and combine using a nice Y adapter...
so this past few days, I was hunting for the nicest looking Y adapter...
and this is the nicest so far from Melotti Racing:


However, there is a few problems:
a. this splitter is very big and if I mounted it near engine side, then, it is hidden so no use for my cosmetic purpose, or can be shown near the fairing vent opening but it will look like a mess of flexible braided line
b. if I mounted at the lower triple clamp, that mean no more horns, and I don't want that... I want my bike to be fully functional like from the factory (even the horn) 🧐
(I know, I am just being too demanding even my bike is only for static display)... plus I already bought that PIAA horn hahaha 😁
Beside, you cannot really mounted it on the triple clamp because the input line will be coming from the ABS and not from the front master cylinder like on this Yamaha R1,
so the braided brake line will have high risk of being pinch... well I think it will be pinch,...
in summary, this won't work... well, it will work without ABS, but if I am not even willing to ditch my horn... I am sure as hell will not ditch my ABS 😉

so after surfing the internet for hours and hours and losing sleep time... I found this splitter below...(and I already order it) I will use the left horizontal port as input from ABS and the two vertical parallel port to go to left and right caliper, each with it's own braided kevlar line. As soon as the splitter arrive, I will measure and take picture and post it here so you can see the size and how it fit.


I think this should be small enough to be bolted on the location near the current bracket (just on top of the radiator), picture below show the location that I plan to bolted this spliter to:

IMG_8142.JPG

I also already order several Goodridge Banjo Adapters that will be used on the ABS ports. I need to buy this Banjo Adapters first so I can then start doing a "simulation brake like" to determine what kind of crimped banjo (and other fittings) that I will need for both the hardline and the kevlar line. Once they arrive and I post pictures, you will have better understanding on what I mean...

Oh, I also bought TITANIUM Tube Nut, yes Titanium material for the 3/16 cooper nickel hardline tubing. This Titanium Tube Nut is only available in Metric 10x1mm thread, so I will have to flare the hardline in DIN/ISO Bubble standard instead of the AN/JIC standard...

Now, regarding Staubli, I also spent some time to study them... and this is the best link to study them: Quick-release couplings for hydraulic applications - Stäubli
I always wondered why everyone is using (and most vendor is only selling) the SPH line with aluminum material... well silly me, the answer is price of course :p
so I guess, I also will only be using the SPH line... I am confident with the safety of the SPH line because it use Bayonet style connection, although I don't think it will ever be road approved due to this...
just make sure you check before you ride your bike, make sure no bad jealous people disconnect your brake line while you park your bike.
Also, I will use the banjo fitting style, this way, not only you safe on weight and extra fittings, it will also act as "bracket" that prevent too much "swing" during riding. I also like the cleaner look compare to another braided line with the staubli connector hanging in between... Anyway, I will update my hardline/kevlar line project, however progress might be slow because I need to order parts, measure/fit, order more parts, measure/fit/fabricate and order more parts etc. etc. etc..
but this will be fun 😇
 

BMW Alpina

FOUNDING Member & Administrator
Staff member
If you want to direct plumb onto your rear master cylinder (or Brembo Calipers) without using banjo bolt and look much cleaner (plus it using TITANIUM Fitting), I "might" found a solution"
So ProTi have this fitting:


ProTi Part# M10-IN-OIL-01

One side have pitch of M10x1.0mm the other side is 3/8 24 (or -3AN thread). I am pretty sure from the picture that you can use a cooper crush washer on the M10 side and plug it into the rear master cylinder port directly,
while the 3/8 24 should be -3AN,... however ProTi did not specifically mention that the convex end is AN standard, so I can not say 100% sure this will work, but I don't see any other reason that ProTi made a fitting like this beside to adapt from -3AN to M10x1.0mm connection. But if it is AN standard, then you can just use a braided hose with -3AN female hose end to connect to the ProTi.

by the way,
one of the Staubli have a connector using male M10x1.0mm but it use O-Ring and I think that O-Ring is not suitable to the Brembo rear master cylinder since the Brembo Master cylinder do not have o-ring groove...

The only reason why I will not use this ProTi for my project is because I want to use Stahlbus banjo bolt with bleeder valve to help the bleeding from the rear master cylinder side.
 

BMW Alpina

FOUNDING Member & Administrator
Staff member
I just got an email with pictures (and invoice 🤑) from the TiN (Titanium Nitride) coating company.
He is going to send this TiN coated Grade 12.9 Steel Bolts today. This Stronger Bolts will replaced all the stock factory bolts on the Rear Suspension (Bracket, and Link).

TiN1.jpgTiN2.jpg

Also took out the front and rear brake line so I can use it as "template", the hardline section of the brake line.
IMG_8153.JPGIMG_8154.JPG
 

BMW Alpina

FOUNDING Member & Administrator
Staff member
If you want to learn more about the Staubli connector, you can download the PDF document from Staubli website:
PDF Download Section

Choose the product as SPH and then on the "specific brochure" choose: SPH/BA motorsports - Hydraulic

You will see that for brake fluid you need to choose the O-Ring in Ethylene propylene (EPDM)material.
and you need to Add /JE at the end of the part number when specifying this (although most likely all the vendor already choose this model, but check to make sure).

As with all connection using O-ring, after several years of use, you need to replace the O-Ring to prevent leak and you should be fine. I did not bought the MotoCorse brake fluid reservoir for my 17RCS Corsa Corta master cylinder because I worry the O-Ring would leak after several years and ruin the fairing, however, the Staubli is located further down and will not ruin the fairing, so I won't worry too much. I am also sure it is not that hard to replace the O-Ring on the Staubli based on the picture from the PDF brochure, beside it is a clean break/quick break solution, right, so just disconnect the two male/female staubli and then change the O-Ring (well I hope it is like that since I haven't bought them yet, so I can't really see the construction of the sealing system), but again, I think it should be simple.

Another thing about aluminum and oxidation is, Aluminum oxidize very fast, but once they oxidized, the oxidize layer actually become the protective layer to prevent further oxidation, so I will not worry about oxidation problem.
The leak (if any after few years) will be caused by the O-Ring not from the aluminum oxidize, otherwise, all the airplane (our our bike) will have a problem since most of them have body/frame made of aluminum.

Now, aluminum can have metal fatique, and when they are fatique, they just gave up and broke without warning. However, since those staubli connector were not face with a lot of load, I don't see how they can just broke by themselves...
but to make sure, I would buy the one that also function as banjo connector and bolted them directly to the caliper (using banjo bolt) instead of how some people kinda like hang them between flexible braided hose.

EDIT:
What I really worry about the STAUBLI is, if you park your bike somewhere, and some JEALOUS people disconnect your brake connection... that would be a big problem !!!,
or maybe they know how expensive it is, and they just CUT your line to steal the Staubli Connector (at least from the side that connect to the braided hose)...
I mean just for the front brake calipers, you are looking to pay around $750 for the 4 pieces of Staubli's connector... a lot of people would be tempted to steal it...
although this does not apply to my application since my bike is just sitting pretty, standing still, looking fast in my living room 😜


More EDIT:
And if somehow you still worry about the strength of the aluminum, the SPH model also available in Stainless Steel or even Titanium.
 

BMW Alpina

FOUNDING Member & Administrator
Staff member
I did my own research and here is what I found:

It is possible to use the Staubli Socket, metric male thread Part# SPH 03.1410/BA/L/KR with Cooper washer as shown in this picture below, however, please note that this is connected to a distribution block with a total of 3 hoses supporting the distribution block (and the distribution block itself might be secured with a bolt through that through hole on the distribution block). This means the Staubli socket will not be subjected to any outside push/pull/sideway force.
Staubli M10 socket with Cooper Washer.JPG


Mounting this Staubli Socket, metric male thread Part# SPH 03.1410/BA/L/KR directly to the FRONT Brembo Brake Caliper is a different story because:

a. it will be subjected to many forces from the jolt from the road bump (remember the caliper is NOT suspended/unsprung weight so any force from the road bump is directly transferred without any suspension to absorb the shock).

b. it also have to withstand the side by side forces when the steering turns (plus the whiplash effect of the hoses and also the other Staubli plug connected on top of the Staubli socket)

c. Please take a look at the drawings below:

SPH 03.1410 BA L KR.JPG

you can see that the "L" dimension is only 8mm and not all of those 8mm is threaded shape, meaning it will only have about 5mm of thread that actually hold (clamp) everything. Compare this to a normal banjo bolt which usually have 10mm of thread available and about 8mm of them engaged. this means the clamping force from the torquing are divided only among 5mm of thread. This put more stress on both the Staubli Socket Connector and the thread inside the Brembo Caliper itself !!!
Plus, both the Staubli and the Brembo were made from aluminum so the chance of this thread fail is higher.
Aluminum main weakness is metal fatigue and it will break without warning... so if you are using aluminum, you better have to design it properly and based on all the above, I just worry if after thousands of mile of hard driving and the aluminum threaded section (below the hex) just snap due to metal fatigue

Now you can always purchase the Staubli Socket in Titanium (stronger thread, right?), Part# SPH 03.1410/BA/TI/KV, however this means the 5mm thread engage inside the Brembo Aluminum Caliper will have higher chance to break/stripped before the Staubli socket during torquing, but of course this is worse... since you don't want the thread in your Brembo caliper to be broken.

d. Please take a look at the picture below:


IMG_8157B.JPG

Non road use Brembo racing/track caliper might has different banjo port shape, but this is the picture of the banjo port on my stock Brembo Stylema caliper.As you can see, it have a "higher/protruding" ring (marked by red arrow). That higher ring help to "crush" the cooper washer, but at the same time, that means it also might crush the O-Ring of the Staubli Socket Metric Male Thread SPH 03.1410/BA/L/KR, because instead of grooves to accommodate the O-Ring, it actually protrude. I did not have the measurement of the O-Ring, so there is a small chance that the O-Ring of the Staubli Socket have larger Internal Diameter than this protruding ring of the Brembo Stylema caliper port, but I doubt it...
so this means, we better use cooper washer, right?

well, take a look again at the drawing above, where it say "14/FLATS" indicating the largest diameter for Hexagonal shape is only 14mm... compare that to the regular Banjo Bolts which have the head diameter of around 15.5mm.
Why this matter? because this again means those 14mm Hexagonal shape of the Staubli Socket have small area to push/clamp the cooper washer and thus more stress compare to a regular banjo bolts (more area to press).
And regular banjo bolts are made of steel and in my case ProTi Titanium Bolts while this Staubli Socket is made by aluminum.


Based on all the above, I rather use the Staubli Banjo Connector, take a look at the drawing below:
Staubli SPH 03.1021 BA L KR BJ Banjo.JPG

First, Staubli take precaution due to aluminum material by making the "thickness" of the banjo to 13.2mm (instead of the regular 10mm for stainless steel).
This is why, it will need LONGER banjo BOLTS.

Second, since this will follow banjo standard size, the inner and outer diameter of that banjo area will be FLAT and about the same diameter as the cooper washer, allowing for more uniform pressure.

Third, it will allow the use of a MUCH STRONGER Stainless Steel or Titanium Banjo Bolts to provide the clamping force.

Forth, those Stainless Steel or Titanium Banjo Bolts will also have the full thread of 10mm with at least 8mm of the tread engage to the thread inside the Brembo Caliper (vs only 5mm if we use the Staubli metric socket).
3mm more thread engagement might not seemed to be much but if you use, percentage, that 3mm extra means 160% more thread engagement vs. the 5mm. (so percentage wise it is a lot).

Because of all the above, even if it is possible to use cooper washer with Staubli metric socket to connect it directly to the caliper, I will prefer the Staubli "banjo" style connection instead.

EDIT: also using the Titanium material will only overcome the "strength" and "metal fatigue" issue of the aluminum, but still have other weaknesses as describe above, not to mention much higher price and it also weight more than aluminum
SPH 03.1410/BA/TI/KB (Titanium Socket) weight 16 grams
SPH 03.1021/BA/L/KR/BJ (Aluminum Banjo Style Connection) weight 14.2 grams


RE-EDIT:
Actually Staubli have a different more compact (and more expensive) quick couplings connector model the CBR02 series and from their PDF catalog it shows that
the Maximum pressure for the CBR02 is PS (bar) 300, however the pressure is DOWNGRADED A LOT if using Cooper Washer as seal.
Version with copper washer sealing maximum pressure is only (bar) 120
 

BMW Alpina

FOUNDING Member & Administrator
Staff member
It's amazing how Freight Forwarding companies like FedEx and also Amazon direct delivery now works on 4th of July and on Sunday. I guess the market is a very strong force 🤑
So during the 4th of July FedEx still work and deliver part of my Goodridge Shadow Series Banjo Adapters order from Summit Racing. One of the banjo adapter below is for the Oberon Clutch Line.
Initially, I want to purchase the Stainless Steel (with Stainless finish) for this banjo adapters, however, only the Shadow Series (Black color) came in the 15Degree angle which I think will fit the ABS line better.
Plus this Shadow Series is also made from Stainless Steel so I decide this is actually better. It will also give good contrast to the ProTi Banjo Bolts (or in the Oberon Case, Stahlbus banjo/bleeder combo).
On Monday, the rest of my Banjo Adapter order from Summit Racing should arrived, and I will take picture to show how it will be oriented on the ABS.
Some of you might ask, why don't just use the "crimped" style connection? Well, I plan to use the crimped connection only when the banjo moves (like on the front caliper and on the front master cylinders).
But on the static connection like on the Oberon clutch slave cylinder or on the ABS, I want to use this banjo adapter so I can use the "SWIVEL" Female 3AN connector. This way, the other end of the hose with the crimped banjo can have their "orientation" easily adjusted.
IMG_8156.JPGIMG_8162.JPG


A few days ago, I dig into my old treasures to find what or if any Goodridge parts (from my past Brembo upgrade for my Honda Fit) that I can use and turn out, I have a collections of brand new Cooper Washer and aluminum.
What really caught my eyes was some of the cooper washer are not shiny, while the other one is very shiny:
IMG_8163.JPG


Then, I realize, I also still need to POLISH my upcoming Cooper Nickel Hardline not to mention polishing the rear suspension bracket/link before they undergo Gold Anodizing.
I checked with a local shop and the rate is $125 per hour which I am sure is a normal rate, however, I decided to just bought all the sanding wheel, polishing compound etc and will do the polishing myself, so I can learn how to polish metal
So I order them from Amazon Friday evening, and it already arrive today (Sunday).... there are some more polishing compound on the way, but I can't wait to start polishing (including those cooper washer).
They will be so shiny, my smiley emoji will need to wear Dark Glasses :cool:

IMG_8158.JPG

And wait, there is a bit more...
So I had bought all the ProTi Titanium KIT for my bike, and now I am still buying more bolts from ProTi, to also replace the bolts that ProTi did not sell as a kit...
However, I do have some bolts that I did not use from the ProTi kit because I have further customization. For example there is an M6x20mm ProTi titanium in silver that was part of the rear brake reservoir kit, and I had been trying to find any location that can use this bolt, and I finally found one.

There is one single bolt that hold the braided oil line from the oil cooler, and I was hoping it is an M6 with 20mm in length. So I took it out and turn out it is M6x20mm (with the regular hex socket head).
I was so excited, but then all my socket tools bit for TORX T-30 are too long, and the space in that area is very limited (due to the front exhaust manifold) to install the ProTi bolts using my regular socket bit, so I was unable to tighten the bolt...
This was on Friday evening, and I decided to also order a manual TORX T-30 wrench and Amazon also deliver them today, so I manage to use it:
IMG_8159.JPGIMG_8160.JPG


And this is the result:
IMG_8161.JPG

I also found some TORX T-30 super short socket and I ordered them today (not arrived yet). hopefully this super short T-30 socket will allow me to use my torque wrench to tightened this bolt to 10Nm. Initially, it was tightened by my hand...

I also just ordered (a few hours ago) some Goodridge Fire Protection Sleeve for the area that need extra heat protection. (and at the same time it will also make it look nice with the Goodridge logo 😁

Also, as soon as the rest of my Brembo Shadow Line Adapters arrive (Hopefully tomorrow), you will see how I use those on the ABS side, which will allow for "easy" orientation using "swivel" female AN (or in some area M10x1.0 DIN bubble female swivel connection) even to the other side of the hose that goes to the brake master cylinder, please stay tune :)
Note: it might look hard initially, but after you do it once, it's like building a very long thin Lego
 

BMW Alpina

FOUNDING Member & Administrator
Staff member
This is just a SNEAK PREVIEW of what I did today (Sept 26'2020), but later this post will be moved since I still need to move my old posts from the old forum and also update the latest things I done before this and make it in the correct order.

But, if looks could kill (for a rear Ohlins Bracket),... I think this could be it 😁:

IMG_8796.JPG IMG_8801.JPG

IMG_8797.JPGIMG_8804.JPG
IMG_8798.JPGIMG_8799.JPG
IMG_8803.JPG
 

BMW Alpina

FOUNDING Member & Administrator
Staff member
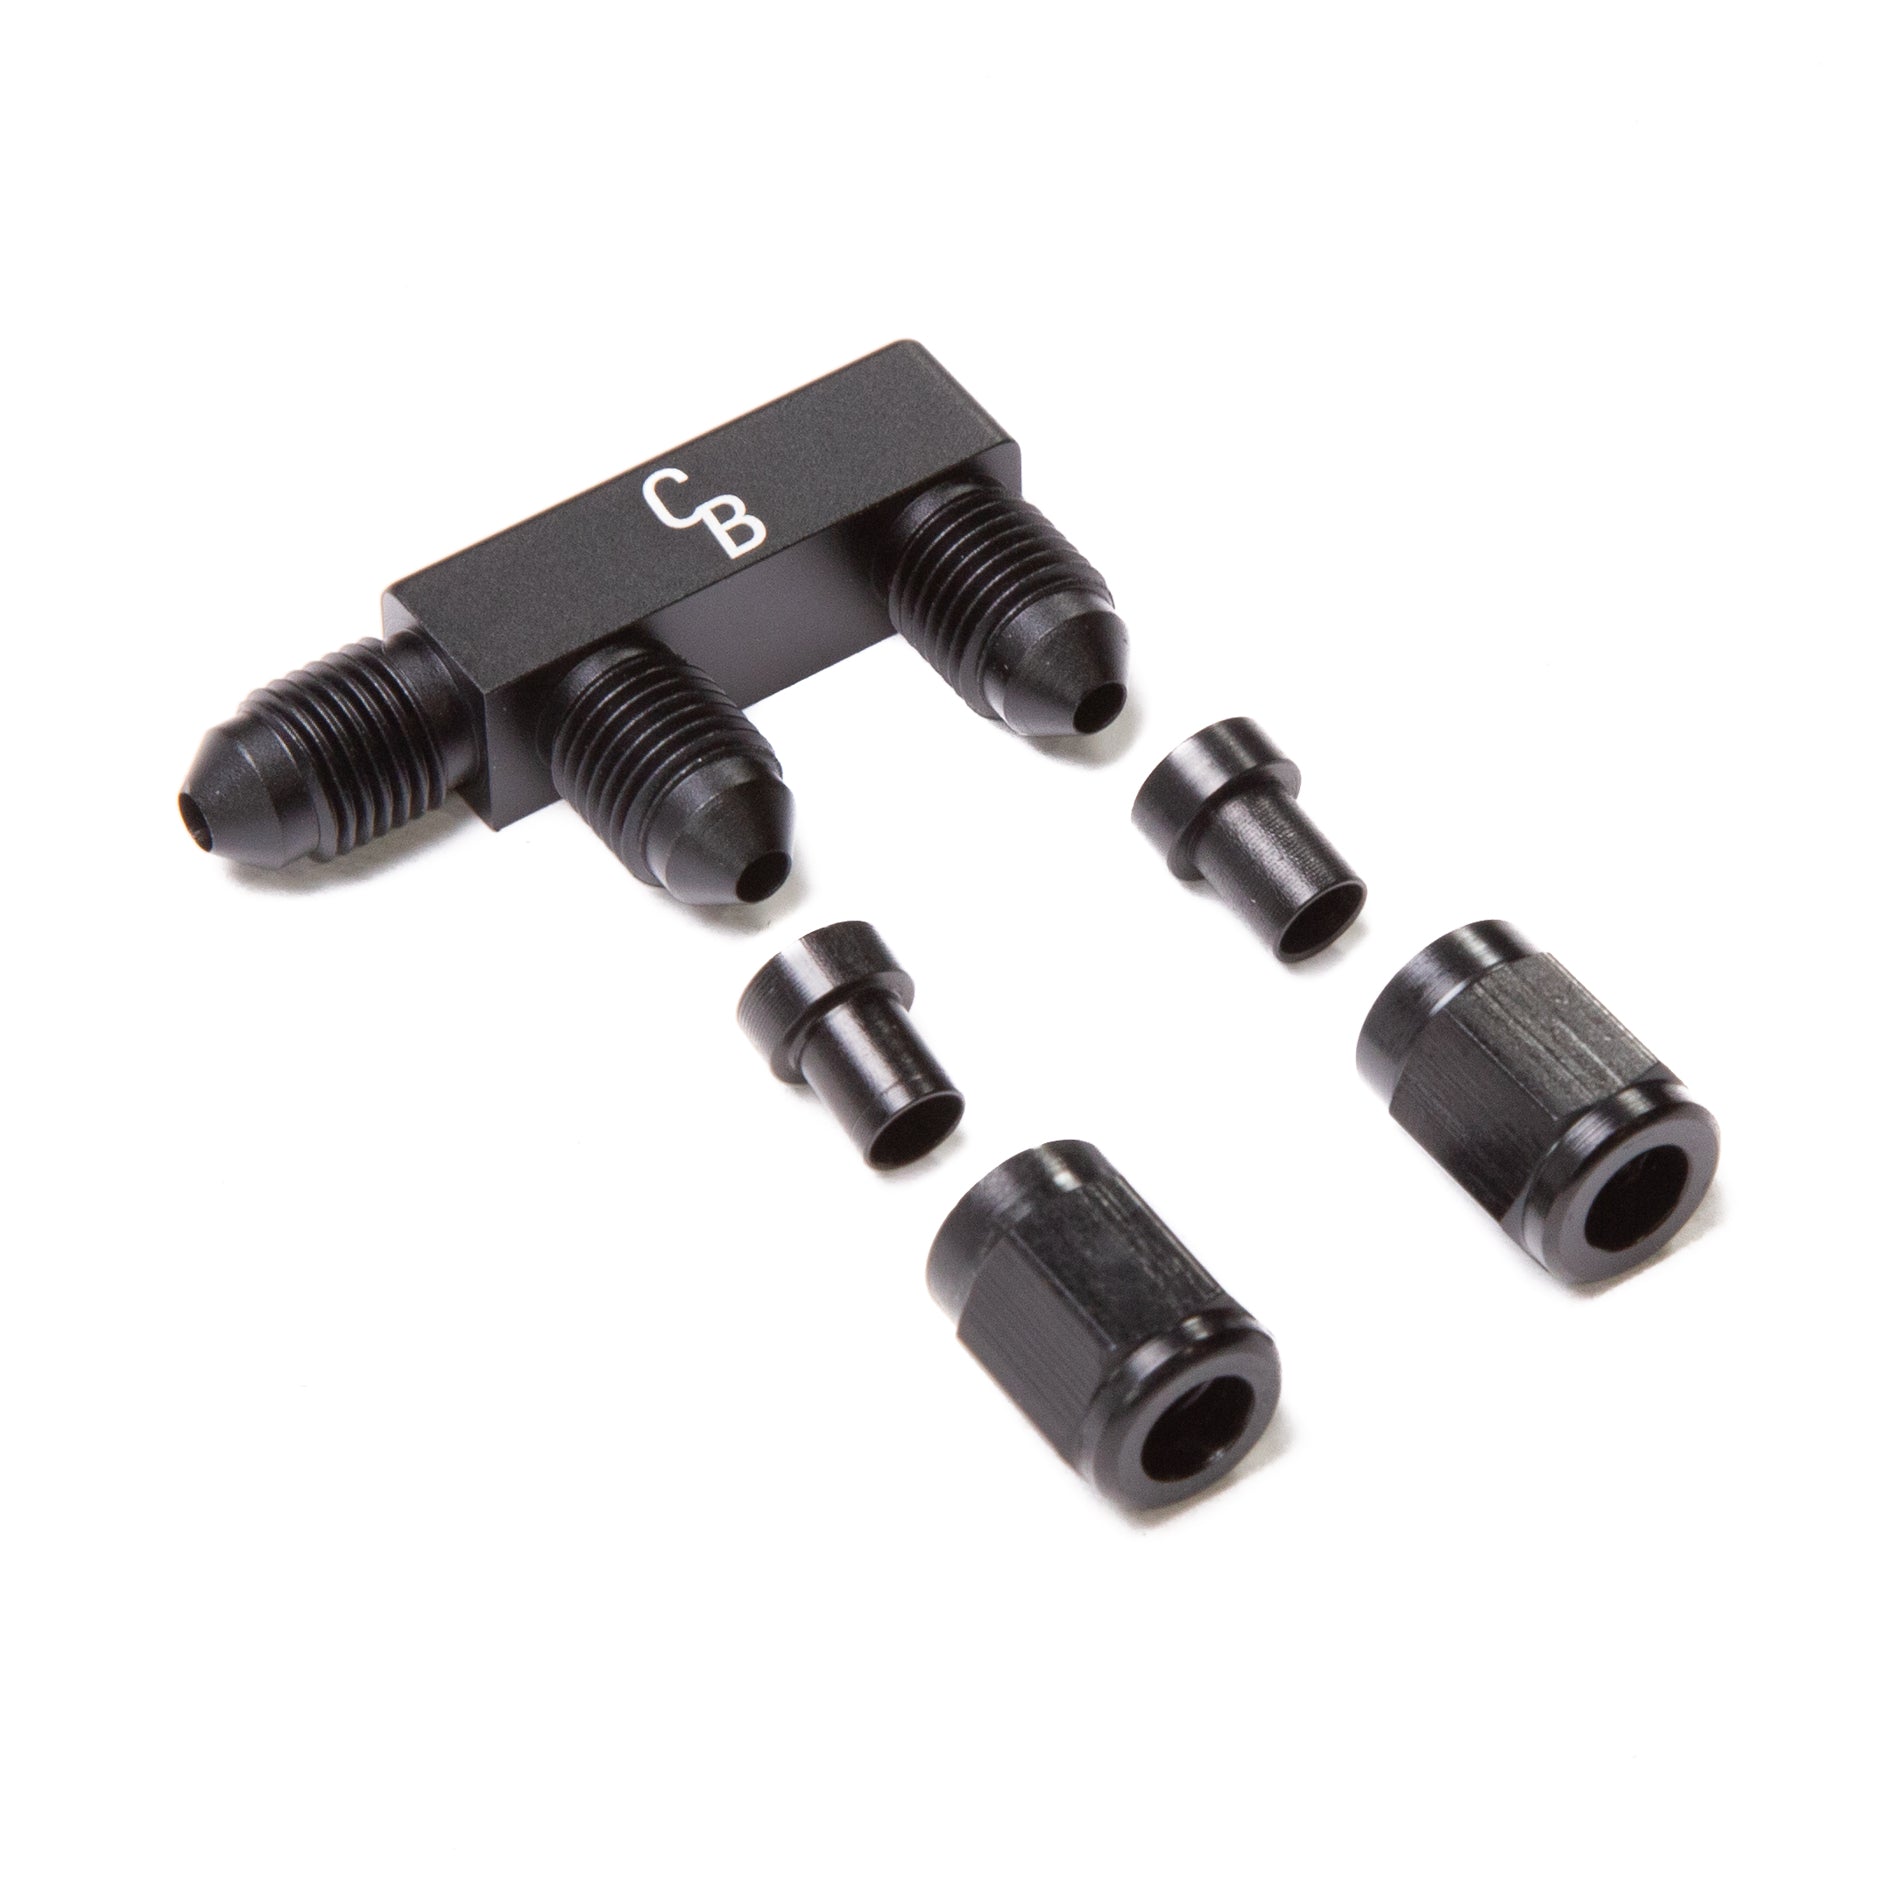
The ChaseBay F shape distribution block and the rest of the Goodridge Shadow Line Banjo Adapters arrived.
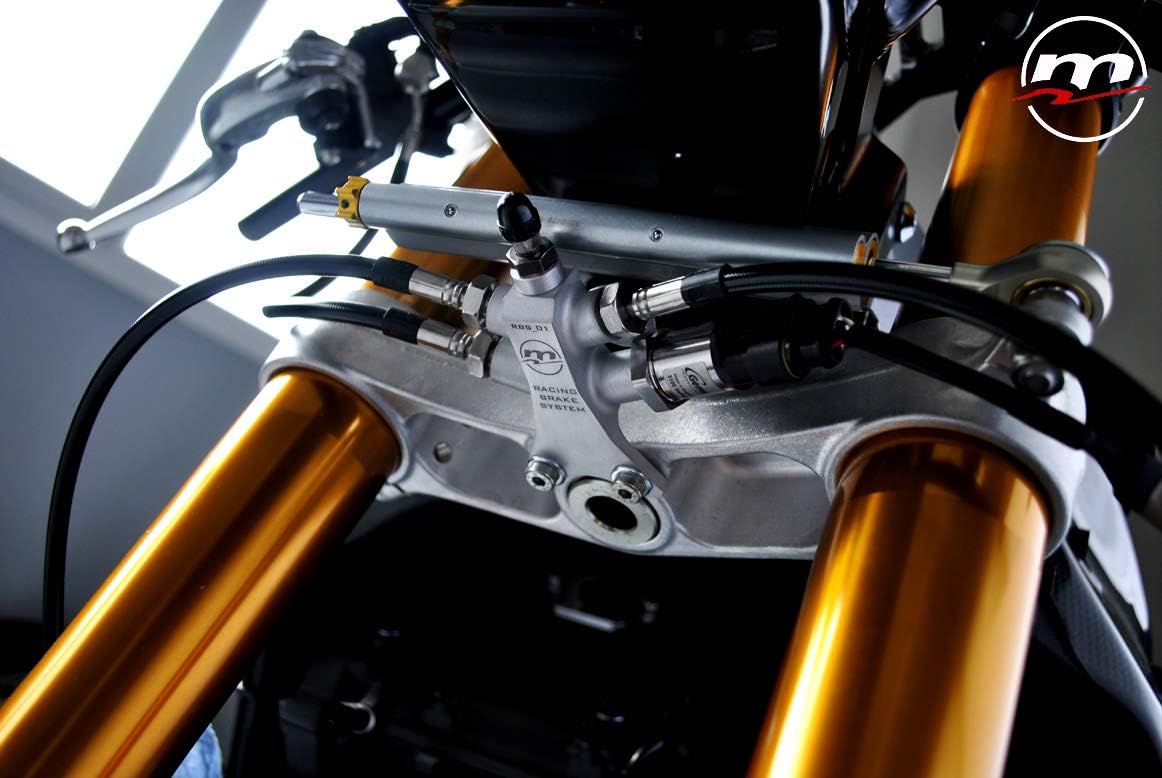
The ChaseBay F shape distribution block is VERY compact and perfect to be place on the original location above the radiator.
It also came with 2 Female Tube Nuts and the inserts in case you want to plumb a hardline tubing to it.
Both pictures shows the size in both cm (metric) and inches to illustrate how compact it is:

IMG_8165.JPGIMG_8167.JPG


This is the location where I will make some kind of bracket to hold it just above the radiator (like the plastic bracket that hold the original steel hardline):
IMG_8171.JPG

Here are the rest of the goodridge banjo adapters:
IMG_8166.JPG


And now, please pay attention to their location on the ABS module:

IMG_8168.JPG


I started measuring the Goodridge Flexible 700 Series Aramid Hose using a flexible measuring tape so I can fully follow the plan "contour" of the hose:
IMG_8172.JPGIMG_8174.JPG


about half an hour later, I already have the measurements of all the flexible braided line and ready to order it. Once they arrive, then I can "Adjust" the hardline measurement by cutting the hardline (and bending it) myself.
Of course you can also just copy the length from the original Ducati brake line, but I want to modify it so it will have more sections using hardline and as less as possible of flexible line because the flexible line, no matter how good they are will have more "expansion effect" under full pressure thus giving less firm feeling, especially since our bike have a LONG LONG line back and forth to the ABS.


The bill of material (BOM) for the Goodridge 700 series Aramid braided lines and using all Goodridge Stainless Steel fitting:
(the latest letter on the part#: C means Stainless Steel, while CBK means Stainless Steel Black Shadow line)


  • Hose#1: ABS to Rear MC
End Fitting A : Part# S6090-03C, 90 degree Forged Female Concave Seat Stainless Steel

700 Series Hose : 8cm (centimeters)

End Fitting B : Part# S451-31C, Female Metric Concave Swivel Stainless Steel


  • Hose#2: Rear MC to ABS
End Fitting A : Part# S5070-03CBK, 70 degree Banjo with Extended Neck Stainless Steel BLACK color

700 Series Hose : 14cm (centimeters)

End Fitting B : Part# S451-31C, Female Metric Concave Swivel Stainless Steel


  • Hose#3: ABS to Rear Caliper
End Fitting A : Part# S6090-03C, 90 degree Forged Female Concave Seat Stainless Steel

700 Series Hose : 10cm (centimeters)

End Fitting B : Part# S451-31C, Female Metric Concave Swivel Stainless Steel


  • Hose#4: Swing Arm Joint
End Fitting A : Part# S451-31C, Female Metric Concave Swivel Stainless Steel

700 Series Hose : 16cm (centimeters)

End Fitting B : Part# S451-31C, Female Metric Concave Swivel Stainless Steel


  • Hose#5: To Staubli of Rear Caliper
End Fitting A : Part# S451-31C, Female Metric Concave Swivel Stainless Steel

700 Series Hose : 15cm (centimeters)

End Fitting B : Part# S6001-03CBK, Straight Female Concave Seat -AN3 Stainless Steel BLACK color


  • Hose#6: ABS to Front MC
End Fitting A : Part# S6001-03C, Straight Female Concave Seat -AN3 Stainless Steel

700 Series Hose : 10cm (centimeters)

End Fitting B : Part# S451-31C, Female Metric Concave Swivel Stainless Steel


  • Hose#7: Front MC to ABS
End Fitting A : Part# S451-31C, Female Metric Concave Swivel Stainless Steel

700 Series Hose : 21cm (centimeters)

End Fitting B : Part# S5094-03CBK ,45 degree Banjo with extended neck Stainless Steel BLACK color


  • Hose#8: ABS to "F" Distribution Block
End Fitting A : Part# S6045-03C, 45 degree Forged Female Concave -AN3 Connector Stainless Steel

700 Series Hose : 8cm (centimeters)

End Fitting B : Part# S451-31C, Female Metric Concave Swivel Stainless Steel


  • Hose#9: Clutch Line
End Fitting A : Part# S6001-03CBK, Straight Female Concave Seat -AN3 Stainless Steel BLACK color

700 Series Hose : 88cm (centimeters)

Line Locator : 2 (TWO) RUBBER mounting Grommet along the hose

End Fitting B : Part# S5094-03CBK, 45 degree Banjo Extended Neck Stainless Steel BLACK color


The only 2 lines that I had not included in the bill of material above are the 2 final lines from the ChaseBay "F" connector to the front left and right caliper,
because I want to bolted the ChaseBay "F" connector with a bracket first before I measure the ideal length of the hose that will goes to the Left and Right Staubli Quick Dry connector and then to the Front Calipers.
However, I already know the end fitting of both which will be
45 degree Forged Female Concave -AN3 Connector S6045-03C with 1 rubber grommet on each hose and ended with Straight Female Concave Seat -AN3 S6001-03CBK that will connect to the Staubli.


Ok, now all I need to do is get a quote from Goodridge because all the connections above are secured using Crimping style and I don't want to spent a few thousand dollars to purchase crimping machine :p
I could build all the hose above myself, but then I got to use the 600 series regular stainless steel braided use and use the "reusable" crimping end fitting. Since for this build I am determined to use the 700 series Aramid Fiber hose which only accept crimping to secure it to their fitting, so I got to pay Goodridge to build all the hoses above for me.

I also need to place an order for the Cooper Nickel hard tubing (which is cheap), but all the tooling needed,
It will cost me about $1,000 for the cooper nickel hard tubing and all the tooling (Earl's flared tooling alone is already almost $500).
I want to buy the best and most versatile tooling so I can use it for future brake line projects (not that I plan to do any right now) :)

oh, last, I found that the most flexible banjo shape to use for the RCS Corsa Corta master cylinder would be a 45 degree banjo, which I found by simulation using the 45 degree Goodridge Banjo adapter that I have (ignore the Stalhbus banjo bleeder in this picture, I just use it to secure the 45 degree banjo when I was doing the simulation):

IMG_8173.JPG
 

BMW Alpina

FOUNDING Member & Administrator
Staff member
I also measured the total length of all the lines earlier today and make a note, I need those total length so I can calculate the required hard line length. (just for approximation)

I posted it here in case someone need it.
(oh, the value below is for the full line length meaning combination/total length of hard line and braided line but did NOT include the banjo length because the proper way to measure the hose (according to Goodridge) is from around the place where you "CUT" the hose. plus those banjo are not all "straight banjo"
Here is the explanation on how to calculate the hose from Goodridge website (which accurate if you are using straight banjo only though) : Buildaline

Back to the total length, here they are:
Line from Rear Master Cylinder to the ABS module = 48cm
Line from ABS module to the Rear Caliper = 130cm
Line from ABS module to Front Master Cylinder = 58cm
Line from ABS module to the Right Front Caliper = 86cm
Line from Right to Left Front Caliper = 35cm
Clutch Line = 83 cm
Also you might want to add 2 or 3cm extra for a bit more "slack".
 
Top